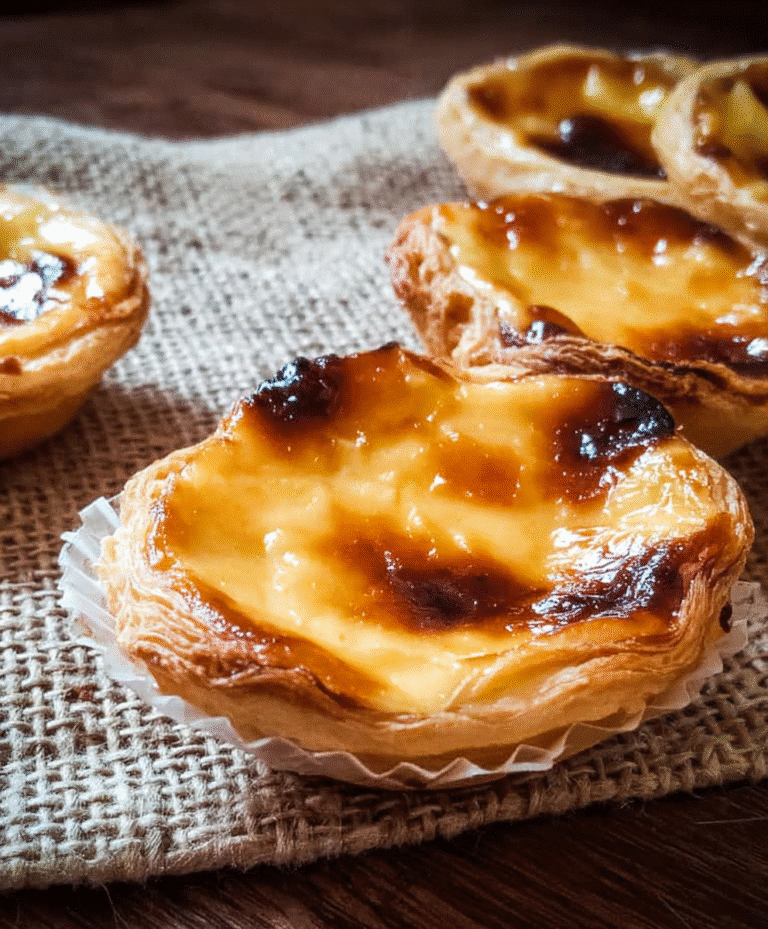
Welcome to the world of classic Portuguese Custard Tarts (Pastel de Nata)! These iconic pastries are celebrated for their irresistibly flaky crusts and incredibly rich, creamy custard filling.
Originating in Portugal, the history of Pastel de Nata dates back over 300 years to the Jerónimos Monastery in Belém, where monks used egg yolks to create the rich, creamy custard filling. Learn more about the fascinating history of Pastel de Nata.
Their popularity has spread globally, even becoming a beloved treat in Macau. Get ready to create these authentic, signature scorched tarts right in your own kitchen with our tested and beginner-friendly recipe.
Why You’ll Love This Recipe
You will adore these homemade tarts for many reasons.
- Enjoy an incredibly flaky pastry that crumbles perfectly with every bite.
- Savor the rich, aromatic custard, infused with just the right sweetness.
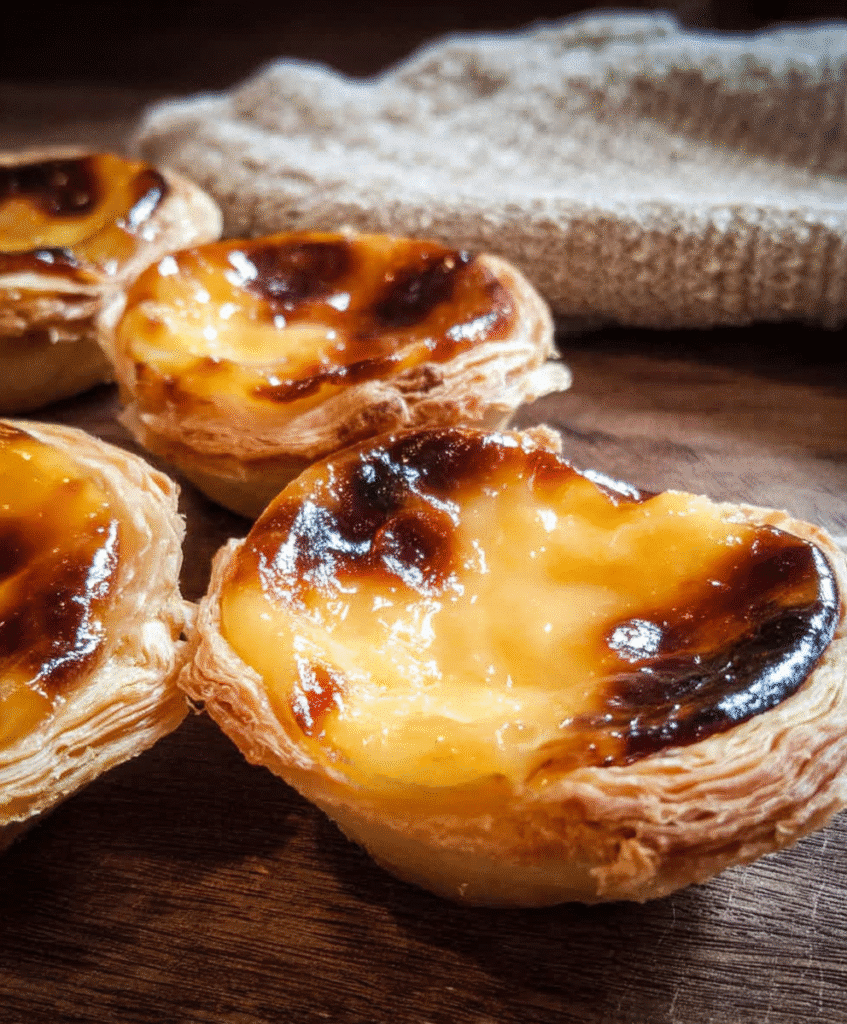
- Achieve those signature scorched tops, a hallmark of traditional Pastel de Nata.
- Recreate the authentic taste of Portuguese custard tarts right at home.
- Impress your friends and family with these beautiful and delicious treats.
Ingredients
Gather these simple components to make your delicious Portuguese Custard Tarts:
- Homemade rough puff pastry (420g)
- Heavy cream (½ cup / 118 ml, 35% fat dairy cream)
- Granulated sugar (½ cup / 115 g)
- Whole milk (1¼ cup / 300 ml, 3.5% milk fat)
- Egg yolks (2 large)
- Cornstarch (4 teaspoons / 11 g)
- Vanilla extract (1¼ teaspoon)
Notes & Substitutions
For the best flavor and texture, we emphasize using homemade rough puff pastry. It provides an unmatched flakiness you will love. When selecting milk, whole milk with 3.5% fat is recommended for the richest custard. Ensure your heavy cream is 35% fat dairy cream for optimal richness and consistency. Cornstarch is crucial here; it acts as a thickening agent, giving the custard its perfect smooth texture without being too dense.
Equipment
You will need a few basic kitchen tools to make your Portuguese custard tarts:
- Small saucepan
- Whisk
- Rolling pin
- Pastry scraper or metal spatula
- 12 mini tart tins (e.g., 7cm top diameter)
- Baking sheet
- Plastic wrap
- Cooling rack
Instructions
Making authentic Portuguese Custard Tarts is a rewarding process. Follow these steps carefully for the best results.
Make the Pastry Shells
Roll out the puff pastry into a 10×12 inch (25×30 cm) rectangle. From the 10-inch side, roll the pastry tightly into a 10-inch long log. Return the pastry to the freezer for 30 minutes to chill until firm.
Cut the chilled pastry roll into 12 equal disks, about 35 g each. You can achieve this by cutting the pastry in half twice, then dividing each of the remaining four pieces into three. Keep half the pieces chilled while you work with the others.
On a very lightly floured surface, place each piece of dough with the swirls facing up. Use a rolling pin to flatten each piece into a disc about ¼ inch wider than your tart tin diameter and 3/16 inches thick. Use flour sparingly to prevent sticking. A pastry scraper helps lift the discs without damaging them.
Place each disc onto the bottom of a mini tart tin. Press the dough onto the tin, forming a small lip that sits on the perimeter. This lip is important to prevent the custard from overflowing during baking. Work quickly to keep the dough cold.
Freeze the prepared tart cups for at least 35 minutes, or until completely frozen. You can prepare these pastry shells up to two weeks in advance and store them frozen.
Make the Custard Filling
In a small saucepan, whisk together the heavy cream, sugar, whole milk, egg yolks, cornstarch, and vanilla extract. Continue whisking until the sugar fully dissolves.
Place the saucepan over medium-low heat. Keep whisking continuously as the mixture slowly heats. Patience is key here; avoid high heat. Watch for steam beginning to form, which indicates the custard is almost ready.
Once the custard thickens enough to coat the back of a spoon, remove it from the heat. Continue whisking, ensuring you scrape the sides of the pan, until the custard is no longer hot. Do not overcook it into a thick pudding consistency, as it should remain fairly thin for baking.
Transfer the custard to a bowl and press plastic wrap directly onto its surface. This prevents a skin from forming as it cools. Allow it to cool completely before using.
Assembly and Baking
Preheat your oven to 475°F (245°C). Place the frozen pastry shells on a baking sheet, optionally lined with parchment paper for easy cleanup.
Spoon the cooled custard into each shell, filling it to about 3/16 inches below the top of the pastry lip. Work swiftly to prevent the custard from soaking into the pastry. Ensure your oven is fully preheated before you begin filling.
Place the baking sheet on the middle rack of your oven. Immediately reduce the oven temperature to 450°F (230°C). Bake the Portuguese Custard Tarts for a total of 20-30 minutes. Check them after 20 minutes and rotate the pan if you notice uneven browning.
After about 25 minutes, look for golden brown pastry and those distinctive scorched bubbles on the custard. If they are present, bake for another 5 minutes. If browning occurs too rapidly, you can turn off the oven and let residual heat finish the baking process. Oven temperatures can vary, so adjust as needed.
When baking is complete, remove the tarts from the oven. Leave them in their tins and place them on a rack to cool. Your homemade Portuguese Custard Tarts will smell incredible. Wait until they are cool enough to handle, as the custard will be extremely hot. Then, remove them from the tins and serve warm.
Pro Tips & Troubleshooting
- Pastry: Always keep your puff pastry as cold as possible. This maintains its flaky layers.
- Custard: Cook the custard gently over low heat. Whisk constantly and avoid boiling to prevent curdling.
- Cooling: Allow the custard to cool completely before you spoon it into the frozen pastry shells.
- Baking: The high initial oven temperature is crucial for creating the iconic scorched tops and crisp pastry.
- Oven: Calibrate your oven temperature periodically. An accurate oven ensures consistent and perfect baking results for your tarts.
- Soggy Bottoms: Ensure your pastry shells are fully frozen before you fill them with custard. This helps create a barrier, preventing sogginess. Baking at a high temperature immediately also helps.
Serving, Storage & Variations
Serving Suggestions
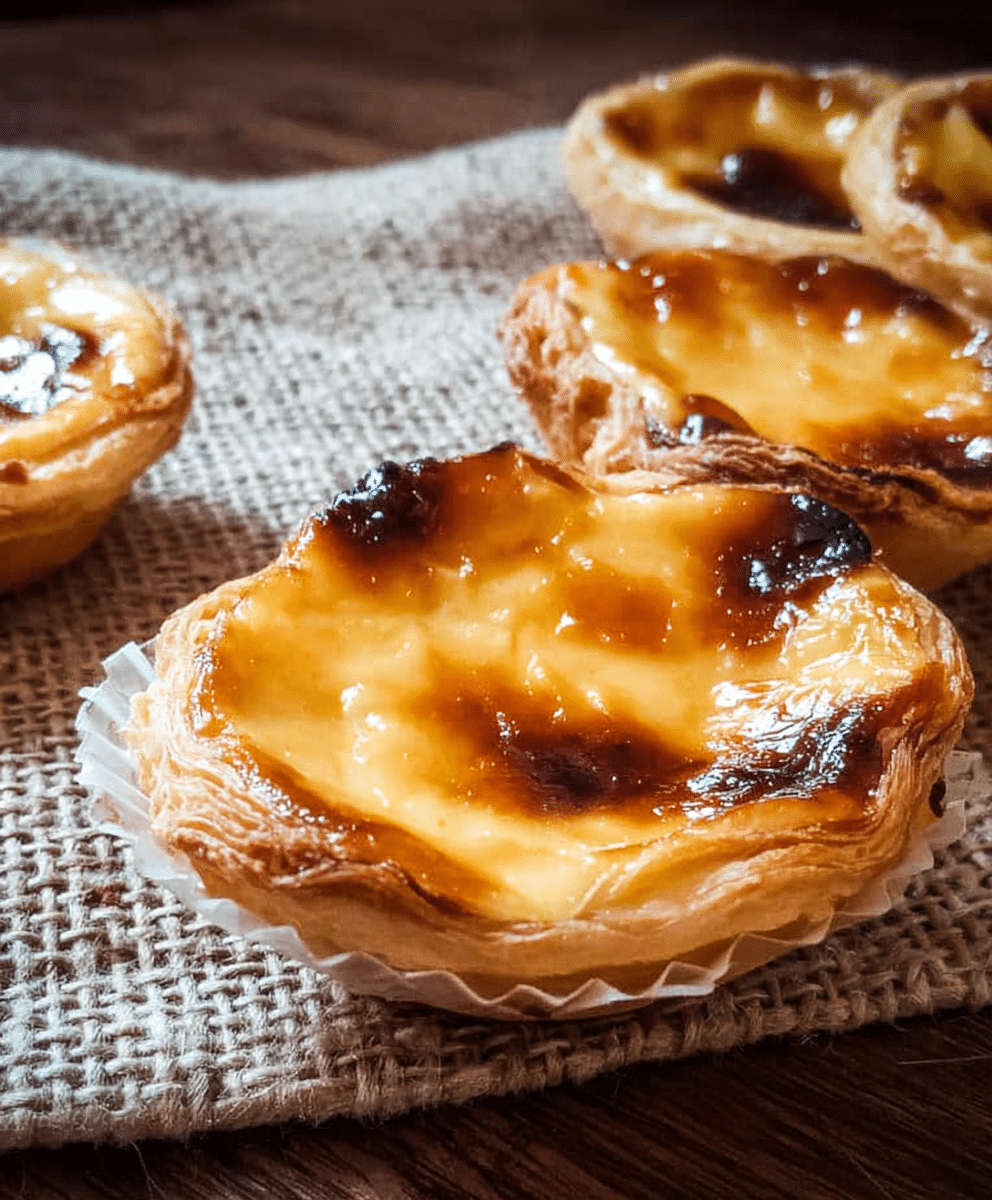
Serve your delicious Portuguese Custard Tarts warm, which is the traditional way. You can optionally dust them with a sprinkle of ground cinnamon for an extra layer of aroma. They pair wonderfully with a cup of hot coffee or a traditional milk tea.
Storage Instructions
Store freshly baked tarts at room temperature for 1-2 days in an airtight container. If you need to keep them longer, refrigerate them for up to 3 days. For longer storage, freeze baked tarts for up to two weeks. To reheat, preheat your oven or toaster oven to 350°F (175°C) and warm them for 7-10 minutes until heated through.
Variations
Traditional Pastel de Nata: This recipe focuses on the classic style, known for its sweet, rich custard and pronounced egg flavor, but balanced.
Macau Egg Tarts: Often, when people refer to Macau egg tarts, they are describing this style, which closely resembles the Portuguese original.
Hong Kong Egg Tarts: These differ slightly, typically featuring a shortcrust pastry shell instead of puff pastry, and a custard filling that is smoother and less eggy, without the signature scorched top.
Nutrition
Here is an estimated nutritional breakdown per serving of one Portuguese Custard Tart:
| Nutrient | Amount |
|---|---|
| Calories | 245 kcal |
| Carbohydrates | 21 g |
| Protein | 3 g |
| Fat | 17 g |
| Saturated Fat | 10 g |
| Cholesterol | 79 mg |
| Sodium | 67 mg |
| Fiber | 1 g |
| Sugar | 10 g |
Please note: These nutritional values are estimates and can vary based on specific ingredients and preparation methods.
FAQ
What is Pastel de Nata?
Pastel de Nata is a classic Portuguese custard tart, famous for its flaky pastry crust and creamy, rich egg custard filling, often caramelized on top.
How do Portuguese and Macau egg tarts differ?
Macau egg tarts are essentially the same as Portuguese custard tarts, reflecting the original recipe brought from Portugal. Hong Kong egg tarts, however, use a different shortcrust pastry and a less caramelized, smoother custard.
Can I use store-bought puff pastry?
While homemade rough puff pastry offers the best results, you can use good quality store-bought puff pastry for convenience. Be sure it is all-butter for the best flavor.
Why are my custard tarts not getting scorched on top?
The high oven temperature (450-475°F) is crucial for the signature scorching. Ensure your oven is fully preheated and consider using the broiler for a brief moment at the end if needed, watching closely.
How do I prevent the tart crust from getting soggy?
Freezing the pastry shells solid before filling them with cooled custard helps create a barrier, preventing sogginess. Baking at a high temperature immediately also helps.
Can I prepare these tarts ahead of time?
Yes, you can freeze the unbaked pastry shells for up to two weeks. You can also bake the Portuguese custard tarts ahead and reheat them.
What’s the best way to reheat Portuguese custard tarts?
Reheat them in an oven or toaster oven at 350°F (175°C) for 7-10 minutes. This helps restore the crispy pastry and warms the custard beautifully.
Conclusion
Creating your own Portuguese Custard Tarts (Pastel de Nata) at home is a truly rewarding experience. From the first bite of the incredibly flaky crust to the smooth, rich, and perfectly caramelized custard, these tarts are simply irresistible. This recipe makes baking simple for busy parents and beginners, allowing you to bring a taste of Portugal into your kitchen. We encourage you to try this authentic recipe and savor the joy of homemade pastries!
Authentic Portuguese Custard Tarts (Pastel de Nata) Recipe
Ingredients
Equipment
Method
- Roll puff pastry into a 10×12 inch rectangle, then tightly roll it from the 10-inch side into a 10-inch long roll. Chill the roll in the freezer for 30 minutes until firm.
- Cut the chilled pastry roll into 12 equal disks, each about 35g. Work with 6 pieces at a time, keeping the rest chilled.
- On a lightly floured surface, roll each disk with the swirls facing up, into a flat disc about ¼ inch wider than the tart tin diameter and 3/16 inches thick. Use flour sparingly and lift with a pastry scraper to keep intact.
- Place each disc into a custard tart tin and press it to form a lip on the perimeter, preventing custard overflow. Work quickly, using flour if needed, and avoid overworking the dough.
- Freeze the prepared tart cups for at least 35 minutes or until frozen; they can be stored frozen for up to 2 weeks.
- Whisk heavy cream, sugar, whole milk, egg yolks, cornstarch, and vanilla extract in a small saucepan until sugar dissolves.
- Heat over medium-low heat, continuously whisking, until the mixture coats the pan sides and steam begins to form. Maintain patience and low heat.
- Once the custard is thick enough to coat a spoon, remove it from heat and continue whisking, scraping the sides, until it’s no longer hot. Avoid overcooking into a pudding.
- Set aside to cool completely, covering the surface directly with plastic wrap to prevent a skin from forming.
- Preheat oven to 475°F (245°C) and place frozen pastry shells on a parchment-lined sheet pan.
- Quickly spoon cooled custard into each shell, filling to about 3/16 inches below the top of the pastry, ensuring the oven is ready to avoid the custard soaking into the pastry.
- Place the pan on the middle rack, immediately turning the oven down to 450°F (230°C). Bake for a total of 30 minutes, checking and rotating after 20 minutes for even browning.
- After 25 minutes, if the pastry is golden brown with scorched bubbles, continue for 5 more minutes; if browning too fast, turn off the heat and let residual heat finish. Adjust baking based on your oven’s accuracy.
- Once baked, remove the tarts in their tins from the oven and place them on a rack to cool.
- Allow tarts to cool before handling and removing from tins, then enjoy warm; reheat in a 350°F oven for 7-10 minutes if desired.